
API’s in PILW.IO
PILW.IO has quite good list of API’s available. With a help of these API’s you can automate various activities in platform. Like create, manage and delete a virtual machine, manage billing, users etc. You can read more about the PILW.IO API’s here. Guide in herewith will be a basic introduction to the REST API commands to manage your virtual infrastructure.
First things first, how to use PILW.IO API
First lets go through some basics here. For issuing API calls you need an endpoint, against where you run the API call to and API key. For PILW.IO the API calls are issued towards endpoint https://app.pilw.io:8443/v1/<resource category>/<resource type>[/<resource attribute>]. We will get to it a bit later what does that mean.
The second thing is API key. API key can be obtained from PILW.IO portal, under the API tab. You can see the API key location in the screenshot below herewith.
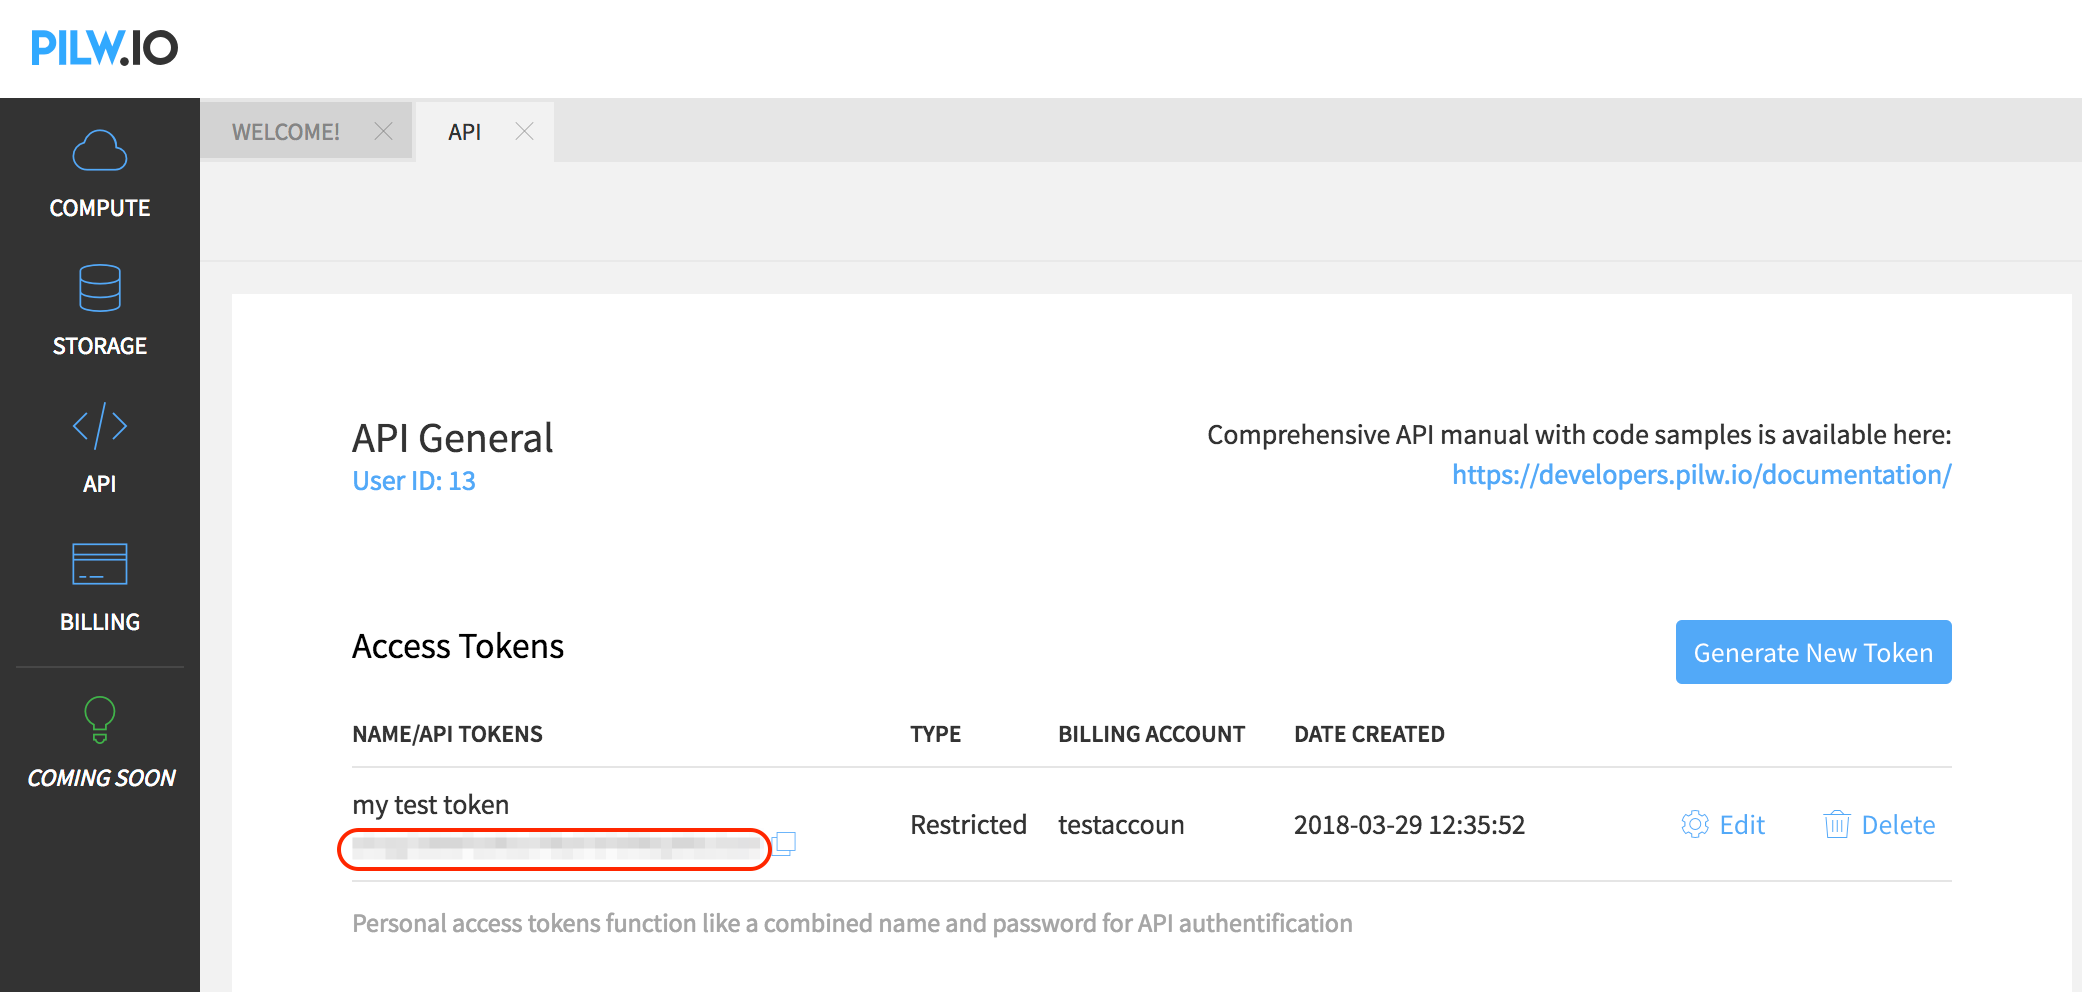
In a screenshot herewith the API key is marked with red and blurred. But the API key token is 32 characters long and is unique across the platform.
Now that we have endpoint and API key, we could use curl command to run the API call. The basic syntax is curl command with a endpoint description and apikey value as a header line of the call. it looks like:
curl "https://app.pilw.io:8443/v1/<resource category>/<resource type>[/<ressource attribute>]" -H "apikey: JgBJRwZKtdBAyMHVQjLLroZF8dKRx7fm"
In example above, there is used fake API token. You need to use your own token there. Now to test the actual command we can in example request user information with the API call:
~$ curl "https://app.pilw.io:8443/v1/user-resource/user" -H "apikey: JgBJRwZKtdBAyMHVQjLLroZF8dKRx7fm" -X GET
The result will be a JSON formatted output, similar to this one:
{
    "admin": false,
    "billing_account": 0,
    "cookie_id": "e7428611b37b40288e8b6110dbe00797",
    "id": 13,
    "last_activity": "2018-10-12 07:42:44",
    "name": "golden.retriever@gmail.com",
    "profile_data": {
        "avatar": "https://link.to.the.avatar/photo.jpg",
        "created_at": "2018-03-22 17:52:51.737085",
        "email": "golden.retriever@gmail.com",
        "first_name": "Golden",
        "id": 6,
        "last_name": "Retriever",
        "updated_at": "2018-03-22 17:52:51.748797",
        "user_id": 13
    },
    "state": {}
}
Now, when the API usage principle is free, we can go ahead and build one simple use case for these. In example we can set up a virtual machine with an API. Before we get there we will need to know our billing account ID. This we can get with running following API command:
~$ curl "https://app.pilw.io:8443/v1/payment/billing_account/list" \
    -H "apikey: JgBJRwZKtdBAyMHVQjLLroZF8dKRx7fm" \
    -X GET
The command was split to several lines to make it more understandable. The output of the command is
[
    {
        "address_line1": "My Street 1",
        "address_line2": null,
        "can_pay": false,
        "city": "My City",
        "company_name": "company",
        "company_reg_code": "1234567",
        "company_vat_number": "1234567",
        "country": "EE",
        "county": "Harjumaa",
        "created": 1531233585,
        "credit_amount": 0,
        "email": "golden.retriever@gmail.com",
        "id": 129148,
        "is_default": false,
        "is_deleted": false,
        "post_index": "76901",
        "title": "My VISA account",
        "user_id": 13,
        "vat_percentage": 20
    },
]
From the list above "id": 129148 shows the billing account ID which can be used in curl command that creates the virtual machine. Following here will be the curl command (in example) to request virtual machine creation, Just pay attention that the billing account ID is used now the one which we found from previous command:
~$ curl "https://app.pilw.io:8443/v1/user-resource/vm" \
    -H "apikey: JgBJRwZKtdBAyMHVQjLLroZF8dKRx7fm" \
    -X POST \
    -d "name=apitest" \
    -d "os_name=ubuntu" \
    -d "os_version=16.04" \
    -d "disks=20" \
    -d "vcpu=1" \
    -d "ram=512" \
    -d "username=tester" \
    -d "password=kgGAgm8m2z" \
    -d "billing_account_id=129078"
And the output should look like this:
{
    "backup": false,
    "billing_account": 129078,
    "created_at": "2018-10-25 14:02:11",
    "description": "",
    "hostname": "hostname",
    "hv_ip": "10.10.35.100",
    "hypervisor_id": null,
    "id": 3588,
    "mac": "52:54:00:0f:e3:09",
    "memory": 512,
    "name": "apitest",
    "os_name": "ubuntu",
    "os_version": "16.04",
    "private_ipv4": "10.1.13.252",
    "public_ipv4": "176.112.147.111",
    "status": "running",
    "storage": [{
        "created_at": "2018-10-25 14:04:32.314408",
        "public_ipv4": null,
        "primary": true,
        "type": "block",
        "name": "sda",
        "uuid": "6a40c05b-8d23-44ce-9747-0195d9aa7f52",
        "updated_at": null,
        "shared": false,
        "pool": "default2",
        "size": 20,
        "user_id": 13,
        "id": 2577,
        "replica": []
    }],
    "tags": null,
    "updated_at": "2018-10-25 14:04:32",
    "user_id": 13,
    "username": "tester",
    "uuid": "6a40c05b-8d23-44ce-9747-0195d9aa7f52",
    "vcpu": 1
}
From the output you can see most of the critical information to work with the virtual machine further. Like UUID of the host, private and public IP addresses and so on. Now, you can log in to the system with ssh tester@176.112.147.111 and install or build your applications or services.
We can list the virtual machine status with following command:
~$ curl "https://app.pilw.io:8443/v1/user-resource/vm/list" \
    -H "apikey: JgBJRwZKtdBAyMHVQjLLroZF8dKRx7fm" \
    -X GET
The output is similar as in creation of virtual machine, but it will be shown for all virtual machines that you have installed. Sometimes you do not need to have virtual machine running all around and you might want to stop it for a certain quiet period. While virtual machine is stopped, you only pay for storage that it consumes and not for vCPU and RAM. For that we need UUID of the virtual machine we are about to stop, which we can get from status command. Here is a quick command to stop virtual machine:
~$ curl "https://app.pilw.io:8443/v1/user-resource/vm/stop" \
    -H "apikey: JgBJRwZKtdBAyMHVQjLLroZF8dKRx7fm" \
    -X POST \
    -d "uuid=6a40c05b-8d23-44ce-9747-0195d9aa7f52"
The result will be shown with "status": "stopped" now. If you have some services running in virtual machine, you might want to shut down it gracefully first with system shutdown command, whether in Windows or Linux. When done we can also start it up again similar way, but with start command:
~$ curl "https://app.pilw.io:8443/v1/user-resource/vm/stop" \
    -H "apikey: JgBJRwZKtdBAyMHVQjLLroZF8dKRx7fm" \
    -X POST \
    -d "uuid=6a40c05b-8d23-44ce-9747-0195d9aa7f52"
The status will be shown as "status": "running".
These API commands can be scripted or even coded in example as a Python script. This way you can build elementary automation with a help of some scheduling tool like cron or Task Scheduler in Windows. Just take a look at our API guidelines and give food for your creativity.