Backup, being important, should be considered also smart way. It is often done with complicated special hardware and software components. This makes it rather expensive and hard to manage. We at PILW.IO would like to offer you a backup solution, that is much simpler to use than complicated special environments and can be automated. In blog article herewith we will explain the backup configuration using PILW.IO API’s. We had blog post with PILW.IO API basic usage, which you can find here.
When created virtual machine in PILW.IO platform, it will not be backed up. You need to enable backup either in UI or with API. In article herewith we will focus on enabling and managing backup routines with PILW.IO API. Since API calls are autonomous and not depend on virtual machine which you would like to back up, you can issue the commands wherever, with access to the API endpoint address:
- You can build in example whole virtual machine that runs backup services in your virtual private datacenter (red scenario in diagram below)
- You can use the server that runs some services or applications (yellow scenario in diagram below)
- You can use system outside of PILW.IO to run backups (green scenario in diagram below)
- Or you can use your own workstation for it (green scenario in diagram below)
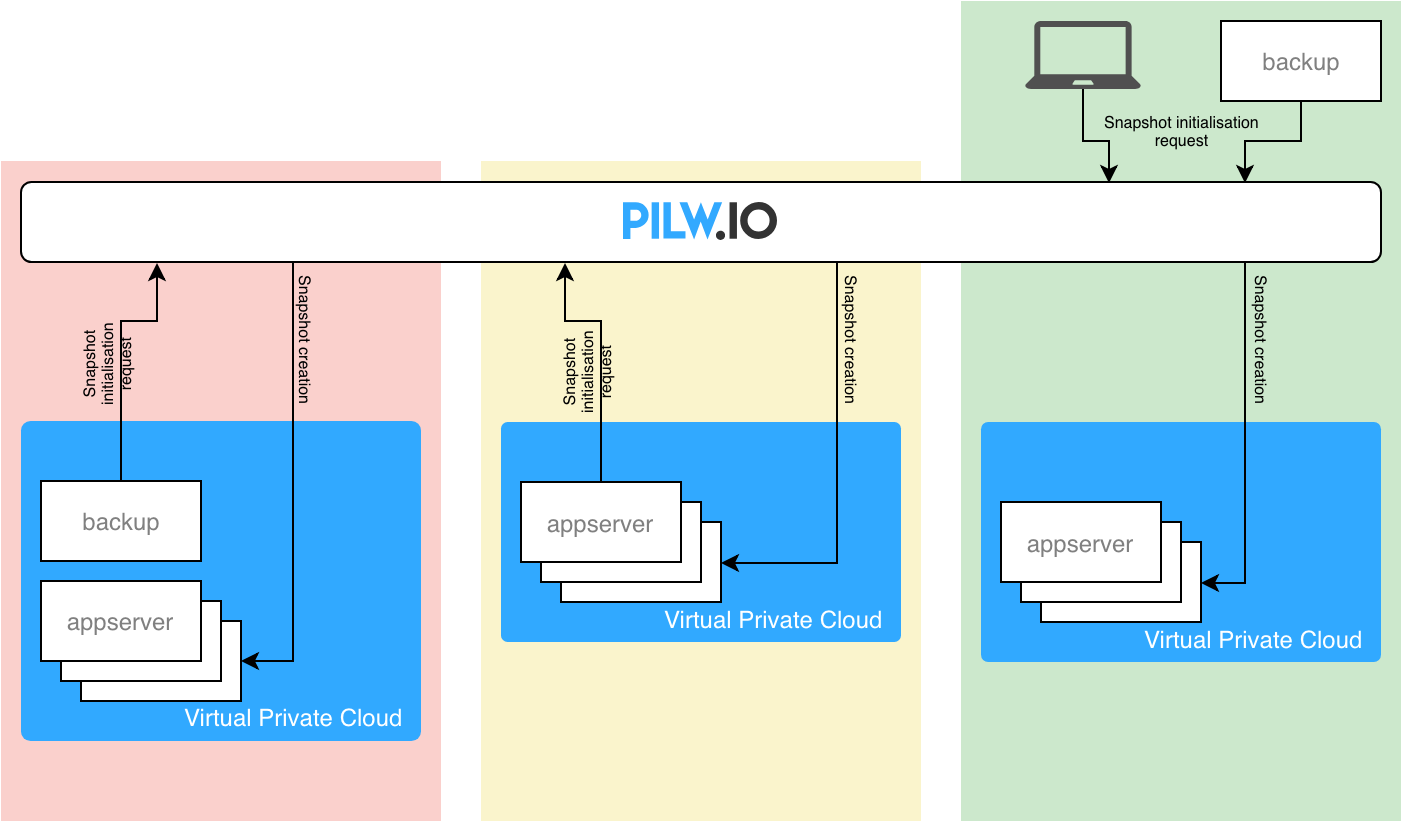
Each of the options has its pluses and minuses. Depending on your application, you might need to consider some interaction with the virtual machine to be backed up. For instance, it might be easier to run some pre- and post-backup scripts either in local system or backup virtual machine in same private cloud environment. The communication between the production system and backup system can be run using internal network communication.
Enable backup
To enable backup the backup flag must be enabled for the server. Enabling the flag will enable once a week backup of your system which you can fully restore to your virtual machine or you can restore it as new virtual machine. In addition to that there are also Clones, which is always good to deploy before critical change. Clones are independent virtual machines with point in time state of your original virtual machine.
In addition to Backup and Clones, there is also possible to use Snapshots. Which are just point-in-time copies of the virtual machine.
Here is example setup, where we have one application server which we are going to back up and backup server. Both are running in PILW.IO environment. As stated above, the backup management can be run directly on the application server also or even your own laptop. Here are the virtual machines description:
backup:~$ curl "https://app.pilw.io:8443/v1/user-resource/vm/list" -H "apikey: JgBJRwZKtdBAyMHVQjLLroZF8dKRx7fm" -X GET
[
    {
        "backup": false,
        "id": 3591,
        "mac": "52:54:00:22:62:7e",
        "name": "appserver",
        "private_ipv4": "10.1.13.252",
        "public_ipv4": "176.112.147.111",
        "status": "running",
        "storage": [
            {
                "replica": []
            }
        ],
        "uuid": "a892cdee-4abd-4ac8-b1e2-c8b676540726",
    },
    {
        "backup": false,
        "id": 3589,
        "mac": "52:54:00:54:27:1b",
        "name": "backup",
        "private_ipv4": "10.1.13.251",
        "public_ipv4": "176.112.147.109",
        "status": "running",
        "storage": [
            {
                "replica": []
            }
        ],
        "uuid": "fcb71632-aed6-4ccb-b285-6c6a599f67ed",
    },
]
The output of the command is way longer, but irrelevant information for article herewith is just removed. To run the commands, please use your own API token. The token in examples in article herewith are not real. To get your token, you can read guidelines in blog post here.
In the output there we have VM’s named appserver and backup. Both they have backup status false and no replicas from neither of them. Lets enable the backup for the appserver. We need the servers UUID, which is from the list above:
"uuid": "a892cdee-4abd-4ac8-b1e2-c8b676540726"
And to toggle automated backup we run command:
backup:~$ curl "https://app.pilw.io:8443/v1/user-resource/vm/backup" -H "apikey: JgBJRwZKtdBAyMHVQjLLroZF8dKRx7fm" -X POST -d "uuid=a892cdee-4abd-4ac8-b1e2-c8b676540726"
{
    "backup": true,
    "id": 3591,
    "mac": "52:54:00:22:62:7e",
    "name": "appserver",
    "private_ipv4": "10.1.13.252",
    "public_ipv4": "176.112.147.111",
    "status": "running",
    "storage": [
        {
            "replica": []
        }
    ],
    "uuid": "a892cdee-4abd-4ac8-b1e2-c8b676540726",
}
Here we see now that automated backup is enabled ("backup": true,) for the appserver. Once the automated backup runs, it will create record in "replica": [] section. It can be seen with VM list command like this way:
{
    "backup": true,
    "id": 3591,
    "mac": "52:54:00:22:62:7e",
    "name": "appserver",
    "private_ipv4": "10.1.13.252",
    "public_ipv4": "176.112.147.111",
    "status": "running",
    "storage": [
        {
            "replica": [
                {
                    "type": "backup",
                    "master_id": 2580,
                    "uuid": "a892cdee-4abd-4ac8-b1e2-c8b6765407262018-10-24-02-00-23",
                    "updated_at": null,
                    "pool": "",
                    "size": 20,
                    "master_uuid": "a892cdee-4abd-4ac8-b1e2-c8b676540726",
                    "id": 757,
                    "created_at": "2018-10-24 02:00:26.469013"
                }
            ]
        }
    ],
    "uuid": "a892cdee-4abd-4ac8-b1e2-c8b676540726",
}
Automated backup is enabled until you disable it manually. You can disable automated backups manually from Web UI or run same API command what enabled these.
Create snapshots
Besides backups you can use also point in time snapshots of your virtual machines. To create snapshot, you just need to run a command which creates replica. First lets list the replicas to see that we do not have any replicas at this point. The same appserver will be used as a system we are going to create snapshots for. The UUID of the appserver will be used in the command:
backup:~$ curl "https://app.pilw.io:8443/v1/user-resource/vm/replica?uuid=a892cdee-4abd-4ac8-b1e2-c8b676540726" -H "apikey: JgBJRwZKtdBAyMHVQjLLroZF8dKRx7fm" -X GET
The response will be just [], because we have no replicas of the system for now. Lets create one:
backup:~$ curl "https://app.pilw.io:8443/v1/user-resource/vm/replica" -H "apikey: JgBJRwZKtdBAyMHVQjLLroZF8dKRx7fm" -X POST -d "uuid=a892cdee-4abd-4ac8-b1e2-c8b676540726"
{
    "created_at": "2018-10-26 12:01:19",
    "id": 2580,
    "name": "sda",
    "pool": "default2",
    "primary": true,
    "public_ipv4": null,
    "replica": [
        {
            "type": "snapshot",
            "master_id": 2580,
            "uuid": "a892cdee-4abd-4ac8-b1e2-c8b6765407262018-10-28-16-57-50",
            "updated_at": null,
            "pool": "",
            "size": 20,
            "master_uuid": "a892cdee-4abd-4ac8-b1e2-c8b676540726",
            "id": 767,
            "created_at": "2018-10-28 16:57:55.549531"
        }
    ],
    "shared": false,
    "size": 20,
    "type": "block",
    "updated_at": null,
    "user_id": 13,
    "uuid": "a892cdee-4abd-4ac8-b1e2-c8b676540726"
}
Here we see we have created point in time snapshot of the system appserver with UUID a892cdee-4abd-4ac8-b1e2-c8b676540726, and snapshot has given UUID a892cdee-4abd-4ac8-b1e2-c8b6765407262018-10-28-16-57-50. Just the time of when snapshot was taken was added to the end of the original UUID. Listing a snapshots with a command above will show you the updated status of snapshots.
To play around with the snapshots, lets create one file in the appserver with a contents something like that:
appserver:~$ echo "This is a file created after first snapshot and before second snapshot." > snapshottest.txt
appserver:~$ cat snapshottest.txt
This is a file created after first snapshot and before second snapshot.
And lets create another snapshot of the appserver:
backup:~$ curl "https://app.pilw.io:8443/v1/user-resource/vm/replica" -H "apikey: JgBJRwZKtdBAyMHVQjLLroZF8dKRx7fm" -X POST -d "uuid=a892cdee-4abd-4ac8-b1e2-c8b676540726"
{
    "created_at": "2018-10-26 12:01:19",
    "id": 2580,
    "name": "sda",
    "pool": "default2",
    "primary": true,
    "public_ipv4": null,
    "replica": [
        {
            "type": "snapshot",
            "master_id": 2580,
            "uuid": "a892cdee-4abd-4ac8-b1e2-c8b6765407262018-10-28-17-27-25",
            "updated_at": null,
            "pool": "",
            "size": 20,
            "master_uuid": "a892cdee-4abd-4ac8-b1e2-c8b676540726",
            "id": 768,
            "created_at": "2018-10-28 17:27:31.360696"
        },
        {
            "type": "snapshot",
            "master_id": 2580,
            "uuid": "a892cdee-4abd-4ac8-b1e2-c8b6765407262018-10-28-16-57-50",
            "updated_at": null,
            "pool": "",
            "size": 20,
            "master_uuid": "a892cdee-4abd-4ac8-b1e2-c8b676540726",
            "id": 767,
            "created_at": "2018-10-28 16:57:55.549531"
        }
    ],
    "shared": false,
    "size": 20,
    "type": "block",
    "updated_at": null,
    "user_id": 13,
    "uuid": "a892cdee-4abd-4ac8-b1e2-c8b676540726"
}
As seen, we have now two snapshots created. These are 30 minutes apart from each other.
Restoring from snapshot
We have created couple of snapshots, and lets try to restore our appserver from these snapshots. We have the test file created and lets rebuild the virtual machine from the first snapshot.
backup:~$ curl "https://app.pilw.io:8443/v1/user-resource/vm/rebuild" -H "apikey: JgBJRwZKtdBAyMHVQjLLroZF8dKRx7fm" -X POST -d "replica_uuid=a892cdee-4abd-4ac8-b1e2-c8b6765407262018-10-28-16-57-50" -d "uuid=a892cdee-4abd-4ac8-b1e2-c8b676540726"
This command restores the first snapshot we created and which has UUID a892cdee-4abd-4ac8-b1e2-c8b6765407262018-10-28-16-57-50. After the command we can see the file we created above to test snapshots, is not there anymore. This is due to we restored snapshot, which was initiated before we created file. Now lets rebuild virtual machine from snapshot that was done after the file was created (snapshot UUID: a892cdee-4abd-4ac8-b1e2-c8b6765407262018-10-28-17-27-25):
backup:~$ curl "https://app.pilw.io:8443/v1/user-resource/vm/rebuild" -H "apikey: JgBJRwZKtdBAyMHVQjLLroZF8dKRx7fm" -X POST -d "replica_uuid=a892cdee-4abd-4ac8-b1e2-c8b6765407262018-10-28-17-27-25" -d "uuid=a892cdee-4abd-4ac8-b1e2-c8b676540726"
Now after rebuild finishes, logging in to virtual machine will show our test file is back in place as it wasn’t gone at all.
Note that when rebuilding your virtual machine from replica, it will be rebooted.
There is also possible to restore your snapshot to entirely new VM. This is useful, in example if we need to restore some components in the system or just rebuild snapshot to create new, lets say, test system. Lets restore snapshot a892cdee-4abd-4ac8-b1e2-c8b6765407262018-10-28-16-57-50 to entirely new VM. The snapshot can be restored this way:
backup:~$ curl "https://app.pilw.io:8443/v1/user-resource/vm" \
    -H "apikey: JgBJRwZKtdBAyMHVQjLLroZF8dKRx7fm" \
    -X POST \
    -d "name=snapshot-recovery" \
    -d "os_name=ubuntu" \
    -d "os_version=16.04" \
    -d "disks=20" \
    -d "vcpu=1" \
    -d "ram=512" \
    -d "username=tester" \
    -d "password=kgGAgm8m2z" \
    -d "billing_account_id=129078" \
    -d "source_uuid=a892cdee-4abd-4ac8-b1e2-c8b676540726" \
    -d "source_replica=a892cdee-4abd-4ac8-b1e2-c8b6765407262018-10-28-16-57-50"

{
    "backup": false,
    "id": 3644,
    "mac": "52:54:00:c6:e7:50",
    "name": "snapshot-recovery",
    "private_ipv4": "10.1.13.234",
    "public_ipv4": "176.112.147.133",
    "status": "running",
    "storage": [
    {
        "replica": []
    }
    ],
    "uuid": "81f00e29-7e0a-4144-aeee-d55c86bce2f1",
}
As a result it is seen the new host with new IP addresses and UUID’s were created. You log in there and you’d be able to see the system as it was when snapshot was taken. As the command to create the new virtual machine involved also parameters defining resources, you could also make server with different resource configuration as the original one.
Exactly same way you can restore also backups.
Delete snapshots
Once created, you can also delete older or unnecessary snapshots, with an easy command:
backup:~/backupscripts$ curl "https://app.pilw.io:8443/v1/user-resource/vm/replica" -H "apikey: JgBJRwZKtdBAyMHVQjLLroZF8dKRx7fm" -X DELETE -d "replica_uuid=a892cdee-4abd-4ac8-b1e2-c8b6765407262018-10-28-17-27-25"
{
    "success": true
}
After the command snapshot list does not have deleted snapshot visible anymore.
Automating snapshots creation
Above we run the commands to take point in time snapshots. You can create a script that runs snapshot and run it at certain time with cron in example. Or you can also use cron to run the snapshot after certain time has passed, e.g. every 4 hours in example. There are actually many ways to do it. First being in example just the script that runs the API command to create snapshot and being started with cron. In example we created backup script /home/backupuser/backupscripts/runclone.sh:
#!/bin/bash

APIKEY="JgBJRwZKtdBAyMHVQjLLroZF8dKRx7fm"
UUID="a892cdee-4abd-4ac8-b1e2-c8b676540726"

/usr/bin/curl "https://app.pilw.io:8443/v1/user-resource/vm/replica" -H "apikey: $APIKEY" -X POST -d "uuid=$UUID"
The API key and UUID is defined in the script with the variable, to make it easy to change if needed. Now you can run command:
~$ crontab -e
The first time you run the cron edit command, it will ask you to choose your editor. You can pick nano, as this one is the easiest. After choosing editor, you can edit one line like this to run backups every night at 02:00:
0 2 * * * /home/backupuser/backupscripts/runclone.sh >> /home/backupuser/backupscripts/backup.log 2>&1
Exit the editor with saving and you are all done. The cron record will command system to run the backup every night and stores the command result to backup.log file along with errors. So you can check for the backup success later on in the morning. You can run also check the snapshots status with just listing the snapshot with:
backup:~$ curl "https://app.pilw.io:8443/v1/user-resource/vm/replica?uuid=a892cdee-4abd-4ac8-b1e2-c8b676540726" -H "apikey: JgBJRwZKtdBAyMHVQjLLroZF8dKRx7fm" -X GET
To make it more advanced, you might want to run automated snapshot creation in a way that old ones will be removed. You might want to consider to build python script to run backups, which we probably will cover in one of the future blog articles.
Also with same script you can run snapshots of several virtual machines.
Create clones
Clones are point in time copies of your virtual machine, but with different UUID and IP address. These are useful to to test some activities or updates before deploying these to live system. Another good use for clones is using these as template virtual machines with all necessary components and configurations in place for simple deployment of similar services. These templates can be stopped, when not in used. To create a clone of your system, you need to run:
backup:~$ curl "https://app.pilw.io:8443/v1/user-resource/vm/clone" -H "apikey: JgBJRwZKtdBAyMHVQjLLroZF8dKRx7fm" -X POST -d "uuid=a892cdee-4abd-4ac8-b1e2-c8b676540726" -d "name=appserver-clone"
The command will respond the parameters of clone. For sake of comparison we can run virtual machines listing command:
backup:~$ curl "https://app.pilw.io:8443/v1/user-resource/vm/list" -H "apikey: JgBJRwZKtdBAyMHVQjLLroZF8dKRx7fm" -X GET
[
    {
        "backup": true,
        "id": 3594,
        "mac": "52:54:00:71:53:7d",
        "name": "appserver-clone",
        "private_ipv4": "10.1.13.244",
        "public_ipv4": "176.112.147.215",
        "status": "running",
        "storage": [
            {
                "replica": []
            }
        ],
        "uuid": "b8ed65ec-5cb9-4de6-a92c-ab18e002889a",
    },
    {
        "backup": true,
        "id": 3591,
        "mac": "52:54:00:22:62:7e",
        "name": "appserver",
        "private_ipv4": "10.1.13.252",
        "public_ipv4": "176.112.147.111",
        "status": "running",
        "storage": [
            {
                "replica": [
                    {
                        "type": "snapshot",
                        "master_id": 2580,
                        "uuid": "a892cdee-4abd-4ac8-b1e2-c8b6765407262018-10-28-19-27-01",
                        "updated_at": null,
                        "pool": "",
                        "size": 20,
                        "master_uuid": "a892cdee-4abd-4ac8-b1e2-c8b676540726",
                        "id": 769,
                        "created_at": "2018-10-28 19:27:06.274010"
                    },
                    {
                        "type": "snapshot",
                        "master_id": 2580,
                        "uuid": "a892cdee-4abd-4ac8-b1e2-c8b6765407262018-10-28-16-57-50",
                        "updated_at": null,
                        "pool": "",
                        "size": 20,
                        "master_uuid": "a892cdee-4abd-4ac8-b1e2-c8b676540726",
                        "id": 767,
                        "created_at": "2018-10-28 16:57:55.549531"
                    }
                ]
            }
        ],
        "uuid": "a892cdee-4abd-4ac8-b1e2-c8b676540726",
    },
    {
        "backup": false,
        "id": 3589,
        "mac": "52:54:00:54:27:1b",
        "name": "backup",
        "private_ipv4": "10.1.13.251",
        "public_ipv4": "176.112.147.109",
        "status": "running",
        "storage": [
            {
                "replica": []
            }
        ],
        "uuid": "fcb71632-aed6-4ccb-b285-6c6a599f67ed",        "vcpu": 1
    },
]
Here is seen backup enabled for the clone. This is due to backup was enabled for the clone source. You might want to disable the backup if you do not need one for the clone. However, there are no snapshots of the clone available. The snapshots are created for the original source virtual machine only. Then also IP addresses and UUID’s are different too.
Since we still had file for testing snapshots restore, we can log in to the clone and see it there.
The idea of the blog article was to explain how backups and snapshots can be run and how these can be automated. Since the whole PILW.IO platform is API driven you can build scripts or programs to manage your virtual PILW.IO infrastructure as you need. You can even integrate the API’s with your applications and build pre- and post-backup scripts for in example putting your database to backup mode before initiating snapshot.