This tutorial will help you get along with Ubuntu faster. This guide talks about basics and is made for newcomers and total beginners who are eager to learn how to get around with Ubuntu servers.
Good to know. The Pilvio environment lets you delete, clone, reverse and create as many virtual servers as you want, as many times as you want. So don’t be afraid to mess around, play, test, fail, repeat and fail again until you feel comfortable enough. Have fun!
What we will cover in this tutorial:
- Tools on Pilvio platform.
- First Login.
- Updates
- Users
- Security
- SSH
- Firewalls
1. Tools on Pilvio platform
Before getting started with Ubuntu administration, let’s take a look at Pilvio platform. To get around we should know 4 main things. How to create virtual server, snapshots and reverse virtual machine in need. Restart and last but not least delete an existing virtual machine. There are also other tools like backup and resource management, but those can be activated either on the fly or need a more in depth tutorial to set up properly.
Create Virtual Machine
I assume you have already made your first account on Pilvio and our administration team has already helped you get going on the platform. If not, feel free to create an account and if necessary, connect with our team through intercom.
To create a Virtual Machine, either select “Virtual Machine” from the starting screen or if you have already explored the platform, go “Compute” -> “New” -> “Virtual Machine”.
You should see something similar:
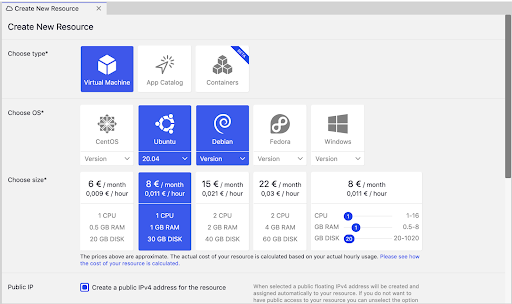
This is the section, where we can create our Virtual Machine. As this tutorial is about Ubuntu 20.04, go ahead and select it. For the resource, you can select any set up you feel like. For current tutorial purposes, we are going to select 1 CPU, 1 GB RAM and 30 GB DISK setup, but it is important to know, we can change those resources at any moment we like.
Good to know: Pricing is done hourly, so if we change the setup, the cost will also change automatically and will be shown in detail at the end of the month. Estimates you can see on the sizes are all monthly estimates in case we run the setup of our virtual server for a full month (30 days to be exact).
Server is also automatically taking one IPv4 public address. In case we want to have a server only working in a private network, we can just uncheck the box. Again, don’t worry, we can add/change/remove public IP-s from virtual machines at any given time.
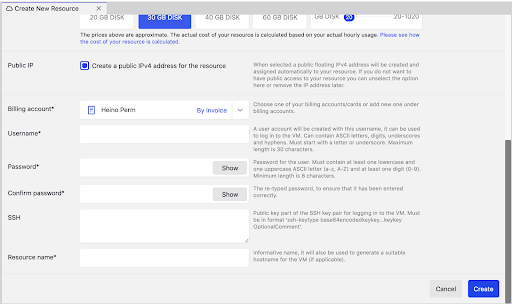
Then we are going to be asked a few questions about Virtual Server name, login and billing account, nothing extreme.
Billing account.
As we created our first BA (Billing account), we already have this one selected for us. Users can have multiple billing accounts simultaneously, as for some cases it helps with accounting, let’s say different projects etc.
Username*
We need to set up a username for our Virtual Machine that we will use to login. You can think of it as the Server administrator. It will not act as a root, but can effectively use all the ROOT user commands (Root is also known as user/admin who can do anything). More about it later.
Example name can be something like this: “serveradmin”
Password*
We need to give our User the password. I will show how to disable password login later and use SSH RSA login only as this can be effectively counted as security risk, specially when password is set up easy to force (examples like 0000 or 1234567). To have a secure password, make sure you follow the rules described on the right side of the textbox.
A good example can be something like this: odK!”h#h131y590D.
***Please do not copy-paste this password!***
SSH
This field is not Required, but highly recommended as adding your Public RSA key saves a lot of time when setting up Server and disabling password login.
Good to know: SSH stands for Secure Shell as a network communication protocol that enables communication between two computers. We will use this as our main way to connect our Server.
Getting the RSA key to add from your computer depends on what OS you are using.
Mac OS X.
All you need to really do, is open your terminal and generate SSH keys with command:
ssh-keygen -t rsa -b 4096
It will ask, where you want to save them, just select default locations and “Enter”. 2 keys will be created. One private, one public. Public key is the one you can share with the servers you want to access. However Private key is used to verify your public key, therefore never ever share this key with anyone!
If you are already familiar with SSH keys or just created one, to copy your public key to clipboard, enter command.
pbcopy < ~/.ssh/id_rsa.pub
Now you have your public key copied on clipboard and you can simply paste it in to the SSH textfield.
Resource name*
All there is left, is to give your Server a name. This name will be used on platforms to identify your server from others you have created or have created.
Example name: “Pilvio Ubuntu tutorial”.
Hit “Create” and approximate 3 minutes later, you got yourself a Ubuntu server!
Create Snapshots
Before going over how to delete servers, it is important to talk about Snapshots. Snapshot creates an image from your current set up on the server and stores it in our StorageVault storage.
This is the most important tool in your arsenal when it comes to having huge updates on your server. Why? Because you don’t want to spend the next three days recovering files when an update you thought won’t do much, destroyed your whole server. Also, it only takes 1 click to do, 2 clicks to restore.
How to create a snapshot?
Once your server is up, select it from the “Compute” menu. If you scroll down, you will find the Snapshot section. To create a snapshot, press the “Take snapshot” button. Please note, snapshot will use disk space and will be charged hourly. If you keep your snapshot only for a few hours, you will only pay for a few hours.

Few moments later, we have our first snapshot created.

We can now use it to Create a new VM, Restore from snapshot or Delete snapshot. As intended use is Restoring, press Restore from snapshot button (it is the one with U shaped arrow).
After pressing it, it will prompt you with a question, if you are sure. To restore, press “Restore”. Moments later, VM is restored to the previous state, where the snapshot was taken.
Delete Virtual Server
Last but not least. I told you from the beginning, on Pilvo, you do not have to worry about troubling someone with your need to create VM-s or worry that you might mess your server up. You can simply delete and create a new one if that is what you need. And yes, it won’t affect your billing as you only pay for the hours you used the server anyway.
To delete a server, all you have to really do, is to select your server from “Compute” and hit “Delete” from the top bar.
![]()
It will ask you, if you want to keep public ip (also known as floating IP), you can choose either one (in case you want to keep that public ip and switch it to another server). And then press “Delete”. Few moments later, no virtual server and you’re back on a blank sheet.
This should cover basics navigating the platform side of this tutorial. Easy!
2. Logging into Virtual Server
There are many ways to log into your newly created Virtual Server.
- Through Pilvio platform, using SSH.
- Through Pilvio platform, using Virtual Console.
- Using your computer Terminal and SSH public key.
1. Through Pilvio platform, using ssh.
Nothing scary here, as this is the easiest way to log into your VM on instant. All you really need for this is to make sure:
- Your VM has public IP.
- VM has port 22 open (Also known as SSH port. We will talk about this more later, but by default all ports are open).
- Your VM allows password login (Also will talk about this later, by default it is allowed).
To login into your Virtual Server, go to “Compute”, select preferred server and click the “SSH” button, next to “Clone” and “Virtual Console”.
![]()
Once you press it, a new tab will appear. You will now be asked for a password and once it is entered correctly, you are in.
If that was your first time, you will be also asked if you want to save your login to the server, enter “yes”.
Wolaa. We are in, say hello to the terminal. But if somehow you forgot your password already, you can change it with the button “Change password” on the platform. This tool is created only to change passwords of existing users. If you have forgotten your username, you can check it from the dashboard below after the field “Username”.
2. Through Pilvio platform, using Virtual Console.
Well it is literally everything like the SSH connection from user experience but a little different from the background. This console can be used with multiple purposes. Also Virtual Console is connecting the Server not from outside, but from inside the datacenter. Think of it as you would take your monitor, keyboard and mouse, and physically connect it with the server.
- You have blocked your SSH access, closed port 22 or server does not have a public IP address.
- You want to use a GUI directly through platform (also useful for windows admins).
- You need to see the BOOT.
To connect through Virtual Console, just press the “Virtual Console” button. This time both username and password will be asked. Once entered, you should be in. Be aware, the results might vary as the server with GUI installed (like windows) will display different results than terminal.
3. Using your PC and Public SSH
Again, how to connect your VM using your own PC varies on the OS your PC is running. Also, to have this kind of connection, the Server must allow your PC-s public key.
MAC OS X
This one is pretty straightforward, also do not worry about short explanations as we will talk about SSH more, later. If you added your public key when creating VM, you can just do following:
- Open your terminal.
- Type in following command:
Ssh [username]@[publicip]
- Hit Enter.
- It should automatically connect you to the server and ask if you would like to save the connection. Type “Yes”.
- You’re in!
3. Updating Virtual Server
Operating systems are updated regularly, therefore we also need to keep our server updated. This is the first step to keep our server safe.
To update our server we must do both, check for updates and than tell our server to run those updates. For that, we use following command:
Sudo apt update && sudo apt upgrade
This is a command that combines both checking and installing. Explained: “sudo” – Stands for root power for the following command, “apt” – package manager (we use it to install, update and upgrade system or applications), “update” – checks for all available updates, “upgrade” – initialises all available updates.
During the command, the system might ask your permission to install a few things. If you wish to force yes for everything, you can add “-y” to the end of command(sudo apt update && sudo apt upgrade -y).
Updates can take a few minutes as it depends how many updates the server is missing. More applications mean more updates.
Once updates are done, you’re all done with system updates. Just keep in mind to do them regularly as it helps you keep the system safe.
4. Users
On Pilvo, you will automatically have your own user and not the root user. But even then, you still will be given sudo privileges when needed. That makes your user dangerous if someone would be able to access the system as you. Also, sometimes you wish to have more than one user to share access between colleagues who do not need as much access or you just want to keep things neat and clear.
So, let’s go over some basic commands in user management, as this might come in handy if needed. We will use “lotte” as our example.
| Create new user | Adduser lotte |
| Add privileges/group | usermod -aG sudo lotte |
| Delete user | sudo userdel lotte |
| Remove user folder (if deleted) | sudo rm -r /home/lotte |
| Change password | sudo passwd lotte |
| Change username | usermod -l oskar lotte |
| List all users | cut -d: -f1 /etc/passwd |
5. Security
Keeping unwanted quests out of the server is one of the most important things about administration. So setting up strict firewall rules and having a selected list of allowed ssh connections are huge factors of having that so. So let’s talk about those a little.
5.1 SSH
Already covered that Secure Shell Connection helps us connect to our server in a secure way. This tutorial will be based on MAC OS X. For windows, you can use a tool called PUTTY. To learn more about PUTTY, check https://www.putty.org/.
There are many ways to connect a user PC with the server. Before connecting the server, we need to make sure, we have SSH keypair on PC and a server to connect to.
Create an RSA key pair.
To create key pair, open terminal and enter following command:
ssh-keygen
By default ssh-keygen will create a 2048-bit RSA key pair, which is secure enough for most use cases. You may also use -b 4096 flag to create a larger key.
When creating a key, you will also be asked where to save it. Default location is good, but if you have something specific in mind, you can address it here.
If you already have a key, it will prompt you with a question to overwrite the existing key. Depending on your needs, you can either say yes or no. Be advised, overwriting the previous key will cause you to lose all access to your previous keys, this action cannot be undone.
You are also asked for a passphrase. Please make it secure. You can also you generator like this: https://untroubled.org/pwgen/ppgen.cgi.
Once done, you will be given information about where your keys are stored, the fingerprint and randomart image.
Creating SSH connection between user PC and server
There are many ways to do that. I am going to show you two ways, one automatically and one manually as both can become handy depending on the situation.
Simple way to connect PC with Server.
If server is already created, you can just open terminal and enter following command:
cat ~/.ssh/id_rsa.pub | ssh [username]@[publicip] "mkdir -p ~/.ssh && touch ~/.ssh/authorized_keys && chmod -R go= ~/.ssh && cat >> ~/.ssh/authorized_keys"
This will take your public key from the PC, connect to the server and save the public key to the server’s Authorized SSH keys document. Of Course you can expect that some questions will be asked along the way.
For example, for the first time connecting, you will be asked if you wish to create a connection as your PC does not recognize the remote server. Type “yes”.
Also, you are asked for the password that username has, you are connecting with. If password is disabled, connection cannot be made that way. That’s why, if you know the password and the server accepts it, you’re done. If not, you need to add the SSH key manually.
Adding SSH key manually
Open the user PC terminal and copy the existing public key to the clipboard (you can also do it later, in case you need your clipboard for something else).
pbcopy < ~/.ssh/id_rsa.pub
Log into your Server with an existing ssh key, password or use any other login method and open ssh authorized_keys document.
sudo nano ~/.ssh/authorized_keys
Create a new last line and paste the public key in. Save the document and you’re done.
Adding other people.
If you wish to add other people simply use their public key. They need to connect the server the same way you do.
ssh [username]@[serverpublicip]
Connecting the server from terminal.
As already mentioned, once you have made your first connection, you can now connect server by using following command in your terminal:
ssh [username]@[serverpublicip]
If you wish to terminate your connection, type:
Exit
Managing SSH keys.
We already covered some of it. If you wish to remove or add users to your server-s authorized ssh connections, all you need to do is edit the authorized keys document. Remember, each key is displayed on a separate line.
sudo nano ~/.ssh/authorized_keys
Configuring SSH to disable password login.
One important step left with SSH. As password login can be brute forced, it is good practice to just disable it, if possible. To do that, all we need to do is open SSH config file, and change password login setting to no. See as following:
sudo nano /etc/ssh/sshd_config
…
PasswordAuthentication no
…
Save the document and restart ssh.
sudo systemctl restart ssh
Once this setting is changed, users can no longer connect to the server using password and only key based connections are allowed.
5.2 Firewalls
We are almost done. Right now, the server has all ports opened. That means, there are a lot of possible threats that can attack the server or at least disturb the performance. It is good practice to open up ports that your PC needs for the application and not more or less.
For our firewall setting, we are going to use UFW – Ubuntu Uncomplicated Firewall. Let’s set it up!
In Pilvio, all ubuntu instances have UFW installed, but disabled. If u wish to check, if UFW is installed, you can type in: ufw app list.
Before enabling UFW, we need to make sure that we can connect to the server through SSH after we endabled it. Therefore lets type in:
ufw allow OpenSSH
Next, let’s enable UFW.
ufw enable
Now UFW is enabled. To check status, type:
ufw status
Keep in mind that UFW blocks all incoming connections other than SSH, which we enabled beforehand. This is good for us as we can now choose what ports we want to open. Since every application and use case is different, here are few options that can come handy:
| sudo ufw allow ssh (or 22) | Allows SSH connections. |
| sudo ufw allow from 15.15.15.0/24 to any port 22 | Allows SSH connections from a specific subnet. |
| sudo ufw allow from 15.15.15.0/24 to any port 873 | Allows Rsync connections from a specific subnet. |
| sudo ufw allow http (or 80) | Allows HTTP connections. |
| sudo ufw allow https (or 443) | Allows HTTPS connections. |
| sudo ufw allow proto tcp from any to any port 80,443 | Allows Both HTTP and HTTPS connections. |
| sudo ufw allow from 15.15.15.0/24 to any port 3306 | Allows Mysql connections from a specific subnet. |
| sudo ufw allow in on eth1 to any port 3306 | Allows Mysql to specific network interface (example eth1). |
| sudo ufw allow from 15.15.15.0/24 to any port 5432 | Allows PostgreSQL connections from a specific subnet. |
| sudo ufw allow in on eth1 to any port 5432 | Allows PostgreSQL to specific network interface (example eth1). |
| sudo ufw deny out 25 | Block SMTP outgoing traffic. |
| sudo ufw allow 25 | Allow incoming SMTP traffic. |
| sudo ufw allow 143 | Allow incoming IMAP traffic. |
| sudo ufw allow 993 | Allow incoming IMAPS traffic. |
| sudo ufw allow 110 | Allow incoming POP3 traffic. |
| sudo ufw allow 995 | Allow incoming POP3S traffic. |
And now we have our basic firewall set.
Conclusion
Thanks for taking time. I hope this tutorial helps you get along with the terminal and Ubuntu. If you have any suggestions or questions, feel free to ask them on our intercom. See you on the platform!